


The keyboard was my first steampunk project. My goal was to "mod" an existing keyboard to be a steampunk one. The keyboard I selected to modify was an IBM "clicky" keyboard from 1984. I chose this keyboard for its highly mechanical nature, unique sound, and high reliability.

The first step in my journey was to figure out what I wanted from my steampunk keyboard. I had seen a lot of variety in styles and I wanted mine to be unique. To me, a steampunk keyboard would have the antique brass look, but also incorporate the mahogany and leather aspects. I also really wanted claw feet. With that idea in mind, I set out to sketch what I thought the final product would look like. I also went to a local antique store to look for "raw materials". There is a shop that sells parts of old mansions that were gutted. Its a great place to stock up on brass tube / light fixturing, antique wood shelves, and a lot of other great inspirational raw pieces. It was there that I found pretty much all of my raw materials.
The other thing I wanted to do up front was to understand my keyboard to see what I could easily do, and what would be hard to do. That meant taking it apart...and it was at this point that I realized I needed some tools.
To take apart the outer covers, I used an extended nut driver to get out the screws holding the two covers together. After that, I started taking off the keys and examining the underlying structure. I wanted to see the mechanism for how the keys slid in and out, how the space bar worked, how the keyboard sat inside the plastic covers, how the circuit board was mounted, how the LED's were mounted, etc.

At this point, I knew I wanted typewriter keys for my keyboard. After doing some research, I settled on using vintage Royal typewriter keys. The nice thing about these keys in particular, is that they use a 3-prong clamp style grommet. From what I had seen, there were two main styles of key construction used. Both incorporated a base metal that was attached to the sheet metal shaft of the key. Then, the cardboard disk with the letter or number on it. On top of that would be the glass lens. And finally, the grommet that would compress the assembly together, holding the lens and cardboard in compression against the metal housing.
The main difference in the two types of construction was that some grommets used an interference fit with the metal housing, while others used tabs that were bent over the back of the housing. I preferred the tab design as it would lend itself better to the modification process.

For acquiring the keys, I used garage sales, antique stores, Criags list and Ebay. A typical Royal typewriter has 48 to 50 keys, depending on the vintage. The IBM keyboard has over 110, so in order to have enough keys for the project, I needed at least 3 sets.
I wanted to retain the functionality of the keyboard for this project, and for me, that meant keeping the awesome "clicky" sound as well. I decided that I did not want to mess with the core mechanics of the actuation, but that I did want to overhaul the keyboard keys to be more steampunk.
The keys for the IBM have three parts to them worth discussing. First is the outer cover. This is nothing more than a snap fit cover over the key that has the symbol on it. This can be discarded. The other two parts are the hood and the shaft.
Using a Dremel cutoff wheel, I cut the hoods of the keys away leaving only the shaft and a square platform. Then, the sanding wheel of the Dremel was used to round off the corners. I tried to make the platform portion of the plastic IBM key resemble the size and shape of the metal housing of the old typewriter keys. Along the way, I wanted to keep the shaft of the key in good condition. For the sanding, it was easy to hold the key and use the Dremel, but for the cutoff wheel, I found that a pair of parallel pliers did the trick for holding the shaft.
My first test key was the Tab key. Once the modification was complete, it snapped right back into place in the keyboard.


I also experimented with the square typewriter keys at this time, although I did not end up using them in my final design. They were very similar to the round, with a few subtle differences that I will mention in case anyone is interested.
Since square typewriter keys are longer, the larger keyboard keys like Shift and Enter worked well for modding. On this keyboard, the longer keys also had a second shaft that was used for stability when depressing the key. This shaft is not used for actuation. When this shaft is cut off from the key, and the typewriter key is installed, the key becomes just a bit sloppier in its actuation.
Also, the vertical keys (plus and enter on the number pad) are useless. Their actuator is different than the horizontal keys, and does not work well at all when the support shaft is cut off. Having some spare keys is essential.
Also, the vertical keys (plus and enter on the number pad) are useless. Their actuator is different than the horizontal keys, and does not work well at all when the support shaft is cut off. Having some spare keys is essential.

Empowered with these successful test keys, I started the extensive and tedious task of cutting and shaping all of the keys for the mod. This was many many hours over several sessions.
The gear that I used for this process was a Dremel with cutoff wheel and sanding wheel, parallel pliers, a set of needle files, and safety glasses.
One big detractor from the visual appearance of my test keys was the ugly off-white color of the original keyboard keys. I wanted to fix this by replicating the "hidden" look of the black steel typewriter key. I crafted a fixture using some scrap wood, duct tape, and clothes hangers that would hold the keyboard keys on them after the shaping process so that I could paint them. For the paint, I used a simple black matte finish spray paint. With this fixture, I could paint six keys at a time.

Before I could go any farther in the key modding process, I needed to do some more thinking about my project. Typewriter keys of this era did not have the same layout as the modern keyboard. The symbols over the numbers, for example were not the same as today, and there was no such thing as a number 1 key (you had to use the lower case L). I quickly realized that I would need to fabricate my own replacements for the cardboard wafers.
For the look and feel of my steampunk keyboard, I wanted an old looking font, something a bit messy, but appropriate of the day. I selected a free font online called "old newspaper" and made all the key combinations in Microsoft Word text boxes. I also converted the F1 through F12 keys to Roman numerals. As far as color combinations, there was a huge internal debate going on in my head. I had seen some models that had both black text on white as well as white text on black, and I liked them both, but had not seen any models that elegantly incorporated both styles into one keyboard. For me, I decided that the keys corresponding to a printable character would be white on black (with the exception of the calculator buttons on the number pad), and the functional oriented keys would be black on white. I thought this setup was well balanced visually. For the paper, I used a medium weight parchment paper (not the kitchen type...this is heavier weight paper) for an aged appearance.
In order to bring these new key disks to life, I had to purchase a 1/2 inch steel punch from the hardware store. This was used to punch out the circles around the characters to get a nice round disk to go into the key. In retrospect, this process sucked, but turned out to look not so bad. Using the steel punch was crude and would often result in a non-centered character on the disk. However, it did give the whole thing more of a "hand made" look.
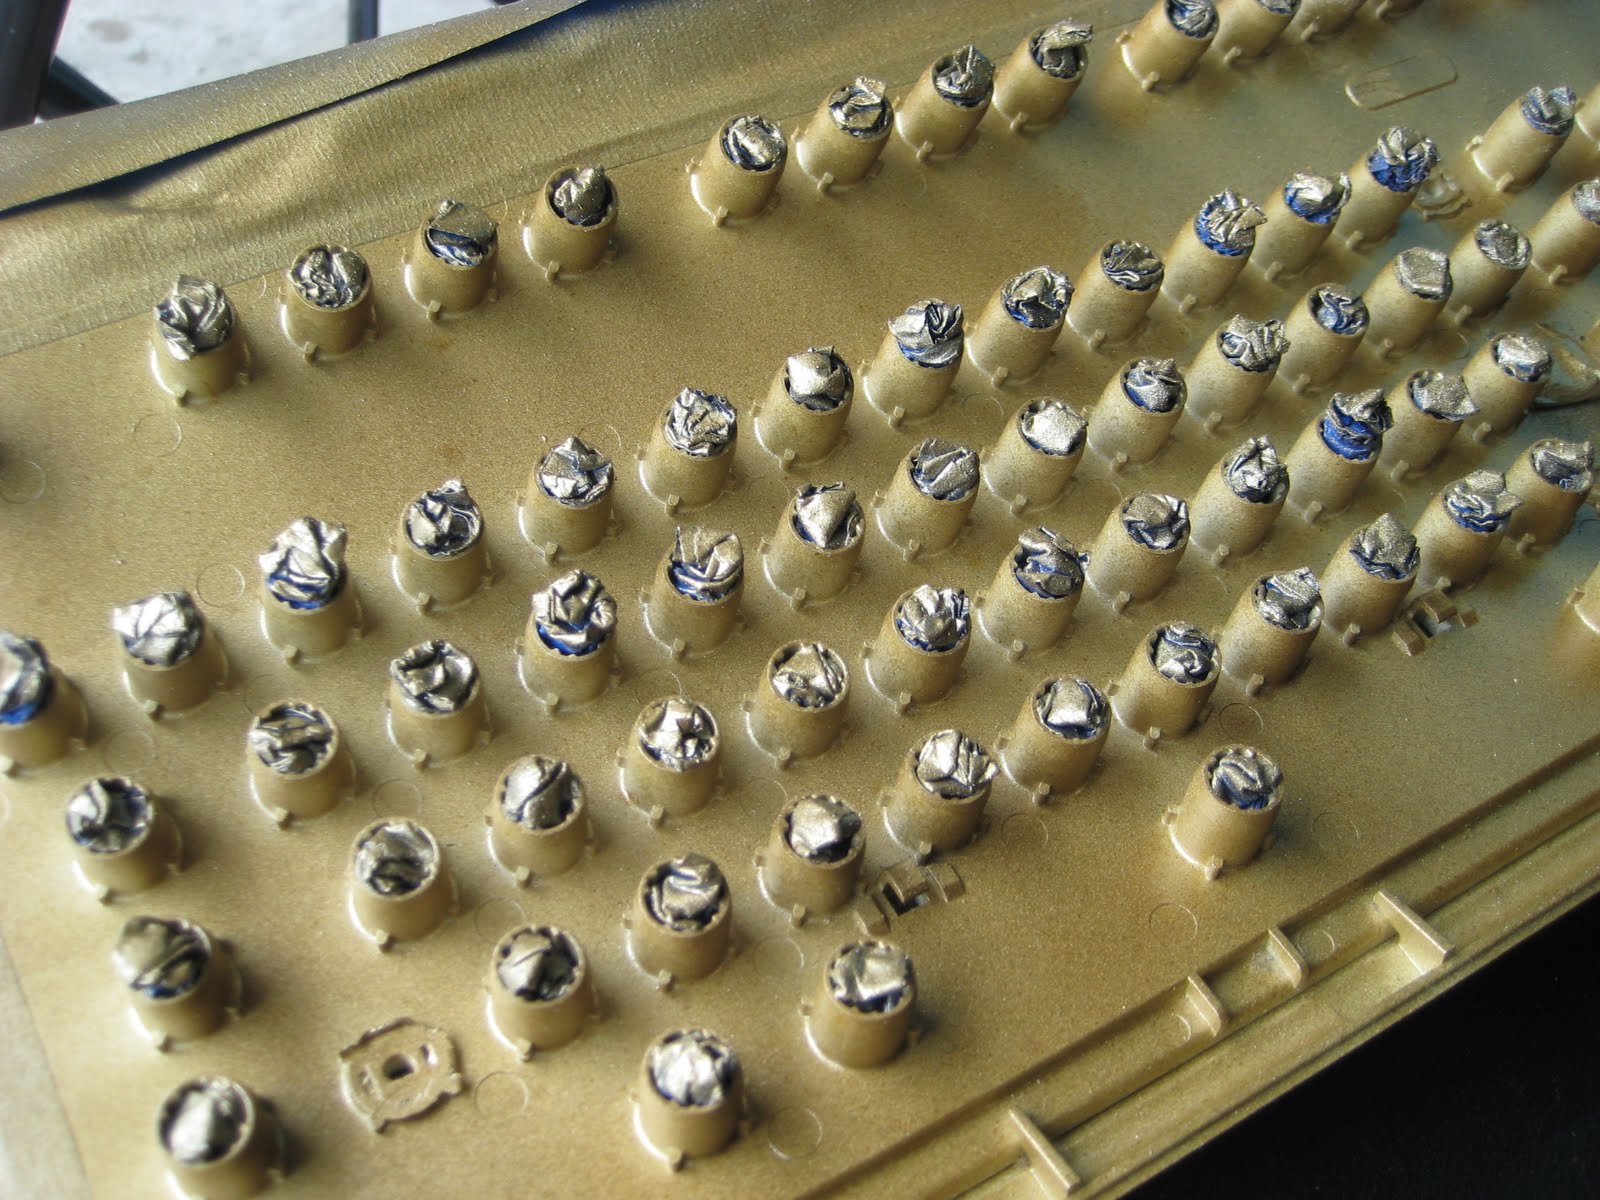
Once the keyboard keys were all cut and painted, and I had my new key disks punched, I began the disassembly of the typewriter keys and reassembly onto the keyboard keys. Somehow, this was an even more tedious task. At first, I was painfully clumsy with the delicate operation of unbending the tabs and removing the often times stuck grommets. Nevertheless, I managed to stick with it long enough to get more efficient and make it through all the keys. This was the result...one bucket full of keys ready for installation.
The gear that I used for this process was the 1/2 inch punch, needle nose pliers, a little slot screwdriver (for peeling the tabs), and a hammer...for the punch.

With the key modding part of the project completed, I moved on to making the wooden sides and brass front and back caps.
From what I had seen online, the side pieces of the keyboards were a big factor in the overall style of the piece. I wanted mine to have an interesting and cool shape, but not be too embellished for the rest of the project...and of course, they had to be tailored to accommodate the claw feet.

I started by sketching some ideas out on paper. Once I got to the design I liked, I made two stencils and cut a blank of wood out of some of the old antique stock I had.

To cut the shape of my pattern, I used a friend's scroll saw. This was the only piece of equipment that I used that was "expensive". Sand paper and the needle files were used to smooth out where necessary. Since I was working with Oak, and I wanted the look of Mahogany, I applied a few coats of Minwax stain and clear coat to get the effect.

I was comfortable leaving the side pieces for now and moving on to another part of the project.
Structurally, the keyboard was supported by a curved sheet of steel, on which all the mechanics were mounted. I wanted to keep this piece, but something had to be done about the whitish plastic.
I decided that I wanted to cover the face of the keyboard in leather and give the protruding mechanical slides an aged brass look. As for the slides that were not going to be used (because I had cut down all the larger keys to support the round style typewriter key), they would be cut off prior to the matting process. This turned out to be a relatively simple task with the Dremel cutoff wheel.
As for the brass look to the plastic, I found a medley of spray paints at the hardware store ranging from gold, to antique bronze, to brown. After experimenting with various mixtures and techniques, I found a system that gave me an aged look similar to the actual brass I had on hand. In order to protect the underlying electronics and mechanics, the keyboard was taped up except for the area to be painted. To get inside the tubes, I made hollow cones of tape that slid down in.
As for the leather matting, a friend donated some authentic deer hide he got from hunting. In order to not screw up this precious finding, I practiced punching all the holes on a photocopy of the keyboard that I had made. This photocopy also made the perfect stencil for the actual punching process.


Totally not feeling the default color, I opted to dye the hide. My initial research led me to the Rit color dye. Paranoid as ever, I made a test coupon and tried two color combinations, tan and brown.


Feeling ok with the darker brown, I took the leap and dyed the piece with the Rit brown. To my dismay, the color did not look so great on the larger piece. Luckily, a friend told me about another alternative, Fiebing's leather dye. After a few applications of this dye, the leather took on a really nice rich aged look and showed no signs of the previous coloring.

Before matting the leather to the keyboard, I wanted to work out some details on the space bar and the LED lights. While at that antique shop, I spotted some ornate brass hex tube and had wanted to find a way to incorporate it to the design. I cut it down to size, split it down the length of the tube, and capped the ends.

While the new space bar fit great and looked cool, the heavy brass weighed down the internal spring that kept the space bar up and returned it up after pressing it. To compensate, I had to add a supplemental spring under the space bar. Picking the right spring was a bit tricky because too stiff a spring would cause the required effort to depress the key to be too difficult, while a spring that was too weak would not overcome the weight of the brass. A box of assorted springs from the hardware store was able to solve this challenge.

For the LED lights, I cut some brass tube on an angle very short and epoxied them to the keyboard. For the lenses, I used the screw on caps for indicator lights from Radio Shack. The lenses fit right inside the tube and the red color, when used with the green LED, filtered the light to a nice amber color.

With the completion of the LED design and space bar, all the pieces were ready for final assembly. A combination of Elmer's rubber cement and epoxy were used to secure the leather to the keyboard. On the reverse surface, I used Gaffer's tape to clean up the seams and cover the sheet metal.
For the brass tubes along the top and bottom, I wanted them to be overlapping the keyboard to cap the leather. In order to do this, I had to slice each tube down the length. There was no easy way to do this. I tried multiple approaches, including a bandsaw, belt sander, and cutoff wheel. As I cut down the length of the tube, it would expand much like a spring expanding after the compression is released. This made it exceedingly difficult to cut a straight even line. Ideally, I think a table saw might have worked, but I managed to get the tubes sliced. To clean them up, I used the needle files to smooth out the cut areas so that when I installed them they would not tear at the leather. I opted to line the inside of the larger tube with electrical tape because I wanted to thread the ribbon cable for the LEDs through it and wanted to keep it protected.
For the brass tubes along the top and bottom, I wanted them to be overlapping the keyboard to cap the leather. In order to do this, I had to slice each tube down the length. There was no easy way to do this. I tried multiple approaches, including a bandsaw, belt sander, and cutoff wheel. As I cut down the length of the tube, it would expand much like a spring expanding after the compression is released. This made it exceedingly difficult to cut a straight even line. Ideally, I think a table saw might have worked, but I managed to get the tubes sliced. To clean them up, I used the needle files to smooth out the cut areas so that when I installed them they would not tear at the leather. I opted to line the inside of the larger tube with electrical tape because I wanted to thread the ribbon cable for the LEDs through it and wanted to keep it protected.
To keep the whole assembly together, I used three 1/4-20 threaded rods that ran the length of the keyboard and through the end pieces. Brass washers and acorn nuts were used to clamp it all together. A few cuts with a hack saw brought the threaded rod to the right length. Once all the brass was in place, I put a layer of clear coat over it to preserve the patina.

After the keyboard was assembled, I wanted to beef up the circuit board mounting and protect it a little better. I cut off a segment of the old bottom cover that used to hold the board, spray painted it to match the brass, and epoxied it to the underside of the keyboard to encapsulate the board. This acted as a perfect chassis for the board and made a really strong connection point for the cable.

Happily, through all the cutting, epoxying , and fiddling, it is still working great. For a finishing touch, I epoxied some of the leather punch negatives to the bottom as pads so that it would not scratch any surfaces it was used on.
Overall I am not sure how long this project took to complete, although I worked on it for a few months intermittently. The overall cost for me was a few hundred dollars, including the cost of the tools I bought. I'm not sure what my next project will be, but this one was a blast and I'm sure I'll do another. If you've gotten this far, then I hope you've enjoyed the read.

Cheers.
Dude,
ReplyDeletePretty sweet! I'm highly impressed!
Nice work, Nick!!
ReplyDeleteBeautiful work and clear tute, thanks for sharing!
ReplyDelete